Data
Creation and Manipulation in ArcGIS
CE 394K GIS in Water Resources
Fall 2004
Prepared by:Alicia Fogg
and David R. Maidment
2. Creating New Features Classes
Creating
Areas from Points or Lines
1. Introduction
As we have discussed in class,
there are extensive resources for GIS information here in the
This exercise will cover two main topics regarding data in Arc GIS, creating new data within the framework and editing existing data within the framework. As a side note, creating and editing data in GIS using the Editor is based on methods developed in computer aided design programs, such as AutoCAD.
The Editor tool can create new points, lines, or polygons. New data can be created using points to define a line feature class or the development of polygons features from either points or lines using the buffer tool.
Data Required: http://www.ce.utexas.edu/prof/maidment/giswr2003/datacreation/doqqflorida.zip This file is 100MB so it could take a while to download!!
Here is the data within this zip file:

The SFWMD_DOQQs.shp
is there so that you can get the spatial reference from it. The dq2409nw.bil is a digital orthophotograph of a region near
2. Creating New Feature Classes

Open ArcCatalog and navigate to the
geodatabase you wish to data your feature classes to
or create a new geodatabase. In this exercise we will create a new Geodatabase called NewData, a new Feature Dataset called

Procedure:
Once you have the geodatabase and
feature dataset created in the manner illustrated in previous exercises, in
this course, right click on the feature dataset
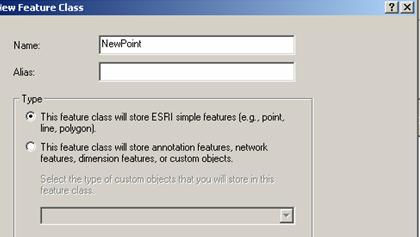
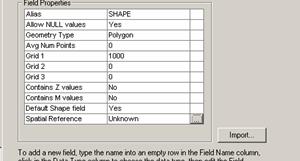
In general, use the default configuration for data storage. Click Next. Now you configure the details of the feature class. This feature class will contain points; therefore, we need to define the geometry of the class as a point feature class. Click in the upper window by Shape, click Geometry, the details of the geometry of the new feature class will appear at the bottom. Select geometry type and click on Point.

At this point, if you don’t have the spatial reference defined on a feature dataset, you can also define the coordinate system of the new feature class. On the Spatial Reference tab, at the bottom of the Geometry information click the grey tab. Import the appropriate coordinate system or the coordinate system of an existing geodatabase you will be adding you data to. In this exercise we will be using a raster with a defined coordinate system, select the file called SFWMD_DOQQs.shp, this also contains the same spatial information.
![]()
Click finish, you have now created a new empty point feature class in your geodatabase.
To create the NewLine and NewPolygon feature classes, repeat this process, changing the geometry for the appropriate feature class for a line and a polygon feature class. Close ArcCatalog.

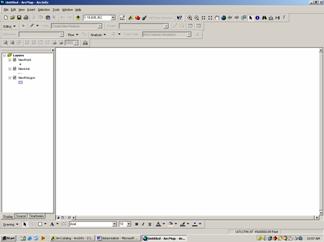
Open your geodatabase in ArcMap. You will notice that there are no points, lines or polygons currently assigned to the feature classes we have created. In this exercise we will create the new features in a visual manner. Previously we have created new point data from a table of X and Y values or used existing feature classes.
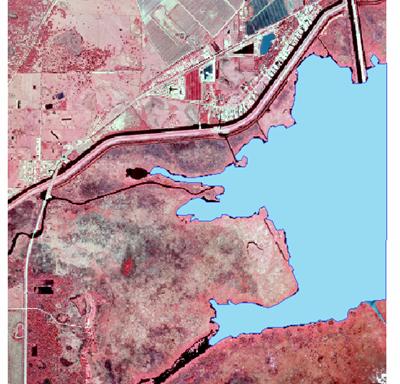
To make this more interesting we can add in a digital orthophotograph of an area in order to create new features to classify this area. Select add data and add in the raster dq2904.bil. You will have to select the added raster and zoom to layer in order to see the orthophotograph.
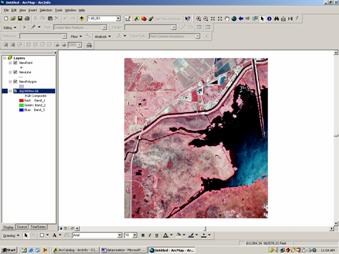
The data that has just been added is an area of the South
Florida Water Management District near
3. Creating New Features
Creating New Points
Start the editor toolbar and make sure you have selected the appropriate file location to edit the newly created NewPoint, NewLine, and NewPolygon feature classes.
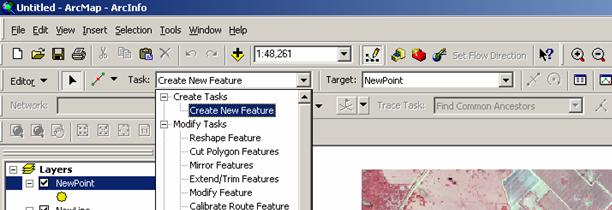
To create new points, select the sketch tool![]() , check
that the task selected is Create New
Feature and the feature selected is NewPoint. You can now
create new points visually. I added
points to all the incoming waterways that enter the lake. There are several methods that you can use to
add points to the data, besides the sketch tool.
, check
that the task selected is Create New
Feature and the feature selected is NewPoint. You can now
create new points visually. I added
points to all the incoming waterways that enter the lake. There are several methods that you can use to
add points to the data, besides the sketch tool.
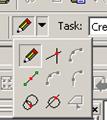
![]() There
are several other features you can use to add points to the geodatabase. Probably the most useful tool to data points
into, besides the sketch tool is the midpoint tool. The midpoint tool will create add point at
the midpoint of the line you draw between two points you create with this tool. Try it out
There
are several other features you can use to add points to the geodatabase. Probably the most useful tool to data points
into, besides the sketch tool is the midpoint tool. The midpoint tool will create add point at
the midpoint of the line you draw between two points you create with this tool. Try it out
|
|
|


Select one side of the lake bank and then select the second bank of the river, a new point will be created in the middle of the river or lake between the two banks.
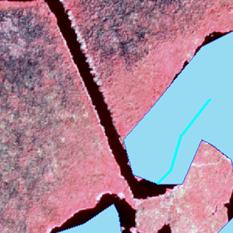
Creating New Lines
There are several methods to create new lines in your geodatabase. You can
use the sketch tool to trace along a line, such as a river to create a
line. Using the sketch tool you create
each vertex of the line by clicking the sketch tool. To finish the line double click the sketch
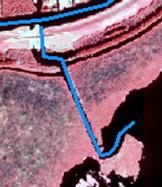
tool. Try creating a new line feature by
tracing along one of the rivers flowing into 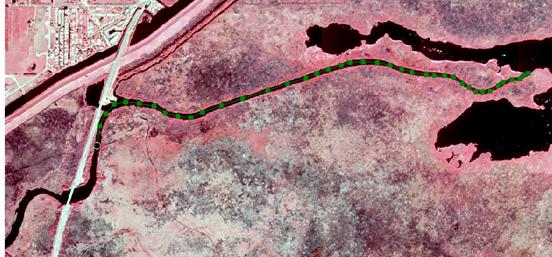

You have now created a new line feature in the feature class NewLine.
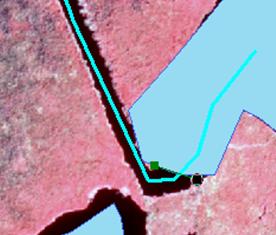
Creating River Center
One option you may be required to do is create a centerline through a body of water. A centerline can be created using two of the editor tools, the sketch tool and the midpoint tool. To start the centerline, select the sketch tool and select the starting point for your line. For the subsequent points of the centerline use the midpoint tool to select the midpoint of the water body. ArcGIS will automatically connect the start of the line to the midpoint created.
|
|
|
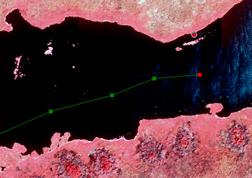
A new vertex of the line is created in the midpoint of the water body.
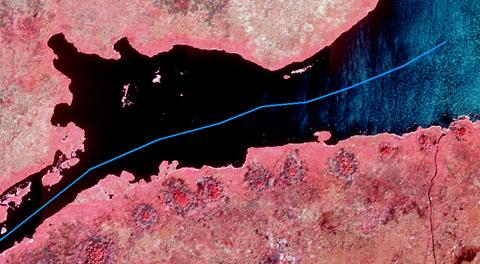
You have now created a line through the center of the body of water.
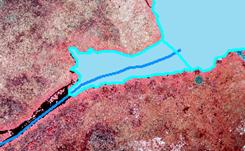
Creating New Polygons
As we have done with points and lines we can create new polygon features. Again, select Create New Feature and the NewPolygon feature class. In this example we are going to create a new polygon that represents the portion of the lake we can see. Normally we would create a polygon for the entire lake; however, for this example we will only look at this portion of the lake. Select the sketch tool and start at any point in the lake. Trace around the lake clicking at representative points to define the outline of the lake. You should get something like this.
Creating Areas from Points or Lines
You can create areas from existing lines by using the Buffer Wizard to create a buffered zone around a line or point. If the buffer wizard is not installed on your computer you may have to add it. Go to Tools, Customize, select the Commands tab, Editor and then Buffer. Drag the buffer icon into the ArcMap display.
![]()

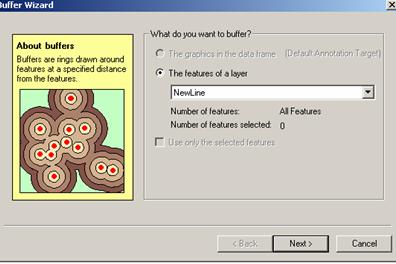
Select the appropriate feature that you want to buffer, we are going to buffer the NewLine feature class in order to create rivers that are represented by areas, instead of lines. We will buffer the rivers to a distance of 50 meters from the line. Make sure the distance units are in meters.
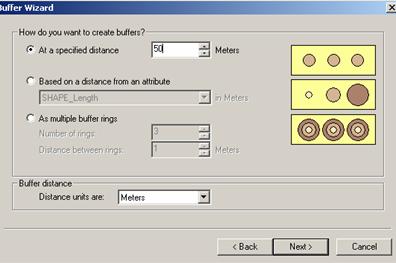
You have two options for the type of barrier between the buffered regions, either dissolved or un-dissolved. In this case we will use an un-dissolved barrier between the regions, this will allow us to describe each river segment individually. If two river segments were too close together then they would become one large area. Save the shape file name and location as desired.
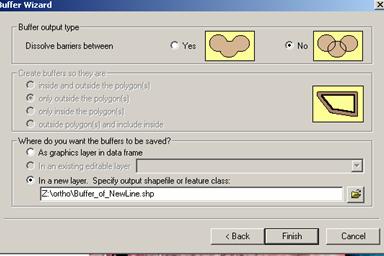
You should now have rivers that now look something like this. If you open the newly created attribute table of the buffered feature class you will notice that the shape of the feature class in polygons. You have now created polygons from lines. You can do the same process again but using points instead of lines, and the results will be polygons instead of points. The creation of areas from lines and points may be useful in describing these features.

4. Editing Existing Data
Editing Points
Turn off the NewLine, NewPolygon and buffered layers, leaving only the raster data and the NewPoint feature class visible. You can now edit the points using the editor toolbar since NewPoints is a point type feature class your are limited to the number of editing function you can perform on a point. The main editing that you can do with a point is to edit the location of the point. Select the point by clicking on the point you want to edit using the edit tool.
![]()
![]()
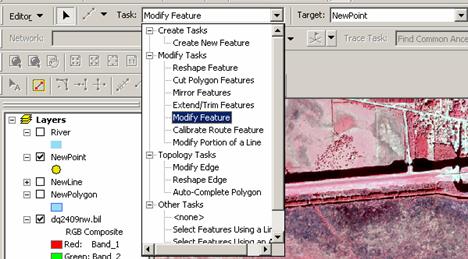
In order to modify the position of a point there are two task options that will allow you to do this, either Modify Feature or Reshape Feature. Make sure that one of these to options is selected when you a moving the location of a point.

You can either delete the point, if the point is no longer required, or you can move the point, if the location you have selected of the initial placement was incorrect. I this example perhaps the location of a monitoring point was incorrect, the actually location of the monitoring point is further upstream, at the bend in the river, just upstream from the present location. You can use the edit tool to the selected point.

Editing Lines
There are several options for editing lines, not only can you move lines, but you can move single points in a line, crop lines or add additional points to the end of the line.
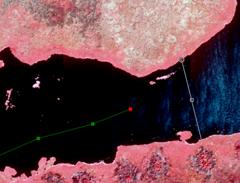
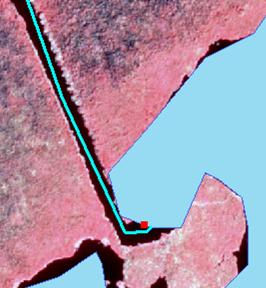
Changing Shape of Line
To move a single point in a line select the Reshape Feature of Modify Feature task option and make sure you have selected the NewLine feature class. To select the line you want to edit, double click on the line. The line will be highlighted with each vertices of the line as a green square and the last point of the line will be highlighted in red. The end of the line highlighted in red is the only one that you can add points to the end of.
|
|
|


By editing the vertices in the line you can edit the line to a new shape, when you are done editing the line, double click off the points and the new line will result. Using the snap tool in the editor toolbar you can snap the two lines together to start the beginning of a network.
Cropping a Line
You can crop a line feature at a specific point, in order to do this start the editor and select the task option, Extend/Trim a Feature. In this exercise, trim the NewLine features if they extend into your NewPolygon feature class. Select the line you would like to trim. Using the sketch tool, the pencil, draw a line at the point you want to crop your line to.
|
|
|
Oh no, we have cropped the wrong side of the line. This crop function in ArcMap crops the line to the right of where you start your line. I have started by line above my line and extended it downwards, this means the line to the right has been cropped, the wrong one. Therefore to crop the correct side of the line I must start at the bottom and draw the line to the top. To erase this mistake while still in editing mode, go to Edit, then Undo. Your line should reappear.
There we go; the line was correctly edited this time.
Editing Polygons
Now we will edit polygons. You may need to breakup to polygons you have created. For example, if you want to look at the bays of a lake separately from the rest of the lake. This is what we will do in this exercise. Separate each bay of the lake, from the rest of the lake polygon by cropping the polygon. To do this, select Cut Polygon Feature from the task list. First, select the polygon you want to cut. Now, using the sketch tool create a line where you want the water body to be cut. The cutting line does not need to be one straight line, but can be made up of many points.
|
|
|
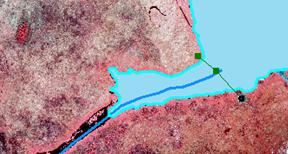
You now have two separate polygons. You can to be same thing with the other bays, or even the polygons you buffered from the lines and points.
This is just a taste of the types of editing you can do with the editing features, don’t be afraid.