
If this procedure is to be repeated for real data, it is extremely important that the point coverage used is projected BEFORE the TIN is created.
It may be necessary to create a TIN which is bound by a polygon (i.e. measurement data located within a lake -- implies that the TIN can not extend over the land surface). In this case, refer to the aml entitled Triangulated Irregular Networks
To start off, you'll need to create the two text files necessary to create the point coverage. Logon to the Alpha of your choice and, at the $ prompt, make a directory under your data directory called ex7, and then brig up a text editor.
$: mkdir ex7
$: cd ex7
Now, create the first text file, called locate.dat, shown below. It is a file of the well-id numbers, x-coordinate, and y-coordinate for each point. The data to be entered into this file are:
1,4.3,1.0
2,16.5,3.5
3,7.0,5.1
4,3.0,6.5
5,11.0,7.0
6,22.0,6.5
7,8.0,9.0
8,3.2,11.8
9,18.1,10.0
10,13.5,12.9
11,4.0,15.5
12,8.7,16.1
13,19.5,16.3
end
Be sure to save it with the name "locate.dat" and move it to your ex7 directory. Also, always remember to press [return] after the 'end' in the text files.
Next, create a second file, call this one head.dat. Its contents are shown. This file contains the well id numbers and the corresponding head measurements of each well.
1,34.6
2,35.1
3,32.8
4,32.1
5,31.5
6,34.5
7,33.3
8,34.4
9,34.3
10,35.2
11,35.2
12,37.3
13,36.3
end
The next thing to do is to 'fire up' ArcInfo so that you can generate the point coverage:
Start up Arc.
$: arc
Now, just as you did for the Base Map generation in the Guadalupe River Basin, you are going to create a point coverage of the well locations. Remember, the coordinate system is arbitrary in this assignment -- that is why there are no lat/longs assigned to this data.
Arc: generate wells
Generate: input locate.dat
Generate: points
Creating points with coordinates loaded from locate.dat
Generate: quit
Externalling BND and TIC...
Arc: build wells points
Building points...
Arc: addxy wells
Adding X,Y Coordinates to wells.PAT
It is important that if your data was actually in geographic coordinates that you perform this step of adding attribute data BEFORE you projected the coverage. The reason is because we are using the wells-id as the relate item. When the coverage is projected, sometimes the points are moved around and different wells-id numbers can be assigned to the projected wells as compared to the unprojected ones. If you attached the head data after the well locations were projected using the old wells-id, you may relate the measurements to the wrong wells. Another way to avoid this problem is to attach a specific well id number to the wells (similar to what you did in the base map assignment with the USGS gage data) before the coverage is projected into a different coordinate system.
To attach the head data to the point coverage, follow the steps below:
Arc:tables
Enter Command: define phead.dat
1
Item Name: wells-id
Item Width: 4
Item Output Width: 4
Item Type: i
5
Item Name: head
Item Width: 6
Item Output Width: 6
Item Type: n
Item Decimal Places: 1
Item Name: [just hit return here to indicate end of table definition]
Enter Command: add from head.dat
Real value expected.
Don't worry about this statement -- everything still
works fine, with this error
Enter Command: q
Leaving TABLES...
Arc: joinitem wells.pat phead.dat wells.pat wells-id wells-id
Joining wells.pat and phead.dat to create wells.pat
This command joins the point attribute table of your point coverage, wells.pat,
with the head data table you just created, called phead.dat. The new table
will also be called wells.pat, the relate item is the wells-id field, and the
head data will be placed after the wells-id field.
Now, before going further, check that you have entered all the data correctly.
Arc: list wells.pat wells-id, x-coord, y-coord, head
Record  wells-id      x-coord      y-coord   head
     1      1           4.300        1.000   34.6
     2      2          16.500        3.500   35.1
     3      3           7.000        5.100   32.8
     4      4           3.000        6.500   32.1
     5      5          11.000        7.000   31.5
     6      6          22.000        6.500   34.5
     7      7           8.000        9.000   33.3
     8      8           3.200       11.800   34.4
     9      9          18.100       10.000   34.3
    10     10          13.500       12.900   35.2
    11     11           4.000       15.500   35.2
    12     12           8.700       16.100   37.3
    13     13          19.500       16.300   36.3
To be turned in: a listing of your wells.pat produced like the one above
Now you are ready to create the TIN. This process is pretty straight-forward:
Arc: createtin headtin
This command initiates a dialog to which you should respond as follows:
Createtin: cover wells point head # # #
This line tells ArcInfo that you are want the coverage wells to be the point coverage from which the TIN will be extrapolated and the field which ArcInfo Createtin will read for the interpolation is called 'head'.
Createtin: end
Weed tolerance set to default value 0.000...
Loading points from coverage wells...
Proximal tolerance set to 0.000...
Removing points within tolerance...
Within tolerance 0. Remaining 13...
Creating TIN...
Writing TIN data structures...
Now, take a look at what you've just created.
Arc: arcplot
Arcplot: display 9999
Arcplot: mape headtin
Arcplot: tin headtin
Arcplot: markercolor 3
Arcplot: points wells
Arcplot: q
Arc: describe headtin
To be turned in: a description of the TIN headtin.
Now, lets convert the TIN to a polygon coverage called htincov:
Arc: tinarc headtin htincov poly
Loading TIN data structures...
Constructing arc/polygon topology...
A TIN doesn't do much without some interpolation of the results. So, we are going to create contours from this TIN. Keep in mind that the ArcInfo Tincontour command does linear interpolation on each line of the triangle. The result, is that sometimes, the contours are very dependent on one measurement at a far away station. You will see the product of this problem when you create the contours for this assignement. Sometimes, the contour lines are not as smooth as one might expect in some areas.
Arc: tincontour headtin contour1 1.0
Sub_division degree is 1...
Weed tolerance defaults to 0.000...
Preparing for contouring...
Assembling contour lines...
This line creates a coverage called contour1 with contour lines at an interval of 1.0 m. So, a contour line will be drawn for every head measurement, starting at the lowest integer value on the coverage and incremented each 1.0 m. The numerical value of the head is contained in the attribute contour in the contour1 coverage. You can try other contour intervals to see the resolution of the head measurements.
Now, you can execute ArcView and take a look at the coverages. Add the themes wells, contour1, htincov to the view. Highlight the wells coverage, under Theme/Properties click on the label symbol and use head to label the points. Use Theme/Autolabel to show the numerical values of the piezometric heads at each well. Try viewing the contour coverage and classifying the contours by color. To do this, highlight the contour theme and go to the legend editor. Change the 'Field' to 'head' and Classify it by Unique Value. You will then see each value of your contour coverage pronted in a different color. Use Ramp with specified colors in the lowest and highest contour levels to get a color shading on your contours.
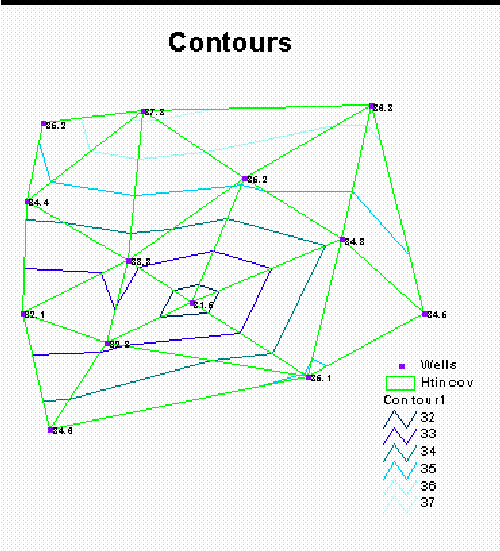 To be turned in: a layout of the wells, the TIN triangles and
the interpolated contours at 1 m interval.
To be turned in: a layout of the wells, the TIN triangles and
the interpolated contours at 1 m interval.
When you're done with this part of the exercise, you'll need to clean up:
$ arc
Arc: kill wells all
Arc: kill headtin all
Arc: kill contour1 all
Arc: quit
$: rm head.dat
$: rm locate.dat
Ok! You're done!