, use Window/ Show Symbol Palette to bring up the Palette, click on the button labeled ABC to get the Font Palette and then resize the lettering to perhaps 24 or 36 point. If you want to color the lettering, choose the Paintbrush icon in the Tool Palette, and in the <A HREF=) Color Palette, scroll forward from Foreground to Text, then choose the color for the text. Label some of the main meridians and parallels in the geographic coordinate view.
Color Palette, scroll forward from Foreground to Text, then choose the color for the text. Label some of the main meridians and parallels in the geographic coordinate view.
The intention of this exercise is to give you experience applying Arcview to view maps in various commonly used projections, and to introduce you to a few more functions within the Arcview interface, such as the procedure for selecting a class of features for display in a map.
(1) Prepare a set of three layouts showing how the world, the United States and Texas look in geographic coordinates and in various map projections
(2) Answer other questions about the analysis that you perform as noted on the instructions in the following pages.
Turn in these answers along with your map and give a brief comment on any difficulties that you had with this exercise.
Map projection involves taking data whose spatial coordinates are defined in terms of latitude and longitude on a curved earth surface and transforming those data so that their spatial coordinates are defined in terms of Easting and Northing or (x,y) on a flat map surface. ArcView permits data to be viewed in various map projections but no new data sets are produced in these projections. Arc/Info permits transformation of data into new projected coordinate systems but use of Arc/Info for this purpose is not included in this exercise.
To begin this exercise, you need to be working at a PC machine with Arcview 2.0 or 2.1 operating and have access to the sample data files which are stored in the same directory as Arcview.
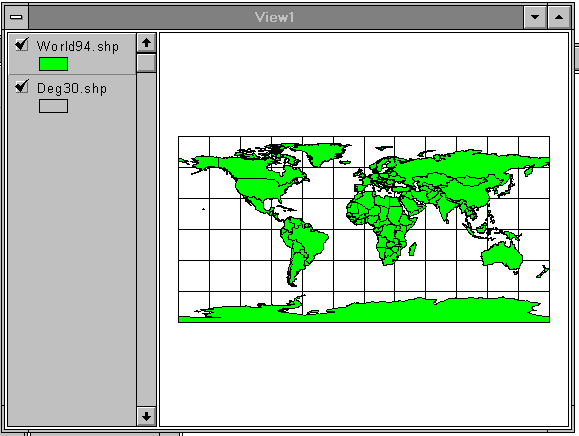
Here is an view of the World in Geographic Coordinates
Move the cursor around on the view and you will see a pair of numbers above the view on the toolbar to the right of "scale" that alter as you move the cursor. These give the location of the cursor and from the values displayed you can see that these data are displayed in Decimal Degrees of Latitude and Longitude.
To be turned in: what is the spatial extent of the view shown in terms of degrees of latitude and longitude? Where is the point (0,0) latitude and longitude located on the earth's surface?
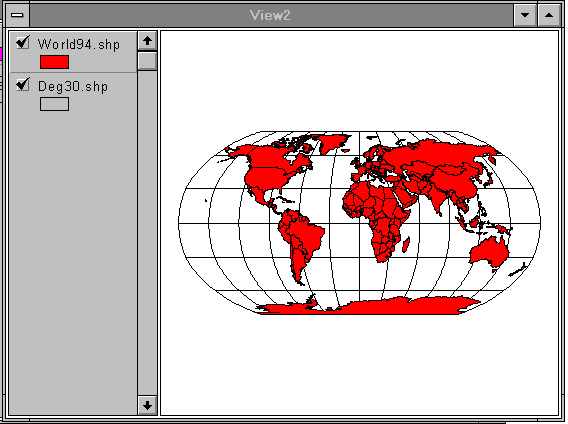
Click on "View/Properties" and you will see a window open with options for Projection. Click on the "Projection" button. Under "Projections of the World" you'll see a projection "Type" labeled "Robinson". Click Ok in the two open windows and you'll see the View transformed to appear in a Robinson projection, which is a relatively new style of map projection for the earth designed to present the whole earth with a minimum of distortion at any location. If you move the cursor over this space, you'll see that the coordinates are now in a very different set of units, meters in the projected coordinate system.
Go back to "View/Properties" and under Projection "Type", click on the arrow to the right of "Robinson", which opens a display window, from which you can select "Geographic". Click, ok, ok, and the View will be transformed back to the appearance that it had originally.
Go back to View/Properties and reproject the View into the Robinson projection.
Here is an example view of the World in Robinson Projection
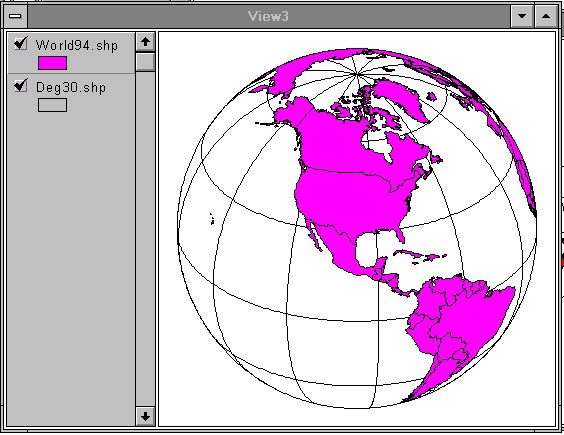
Go to the View/Properties sequence and this time under projection Type, select "View from Space" (the last option in the list of "Projections of the World"). You'll see a nice 3-D view of the globe as seen from a viewpoint above Massachusetts. If you want to see how the world looks when viewed from above Austin, Texas, go back to the projection selection window, click on "Custom" and then type -97 for the Central Meridian and 31 for the reference latitude. And there is the world centered on Austin, Texas! You may wish to try looking at the world from a few other places. You can get the coordinates of locations on the earth by viewing earth in the geographic projection. Play around a bit and have some fun!
Here is an example view of the World from Space above Austin, Texas
 at the right end of the lower tool bar to create a space on the layout for View 1 and add the View to this space. Repeat the Exercise for View2 and View3.
Label the Views of the World with the Character Tool Color Palette, scroll forward from Foreground to Text, then choose the color for the text. Label some of the main meridians and parallels in the geographic coordinate view.
Make a printout of the Layout. Save the Project (File/Save Project As) so that you don't have to recreate it again later if you need it again.
Here is an example of the Layout of Projections of the World
To be turned in: A printout of the Layout showing the three views of the world
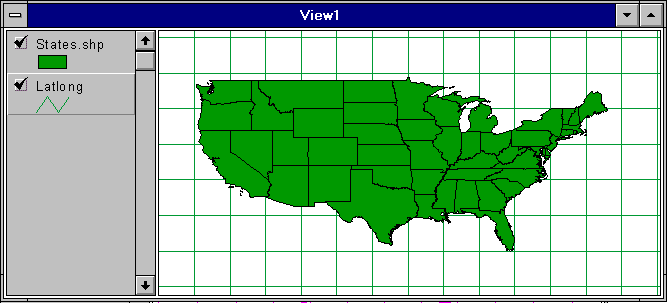
 to drag the United States into the center of the view window if necessary. Pretty cool!
Here is an example of the United States in Geographic Coordinates
Question: What is the geographic extent of the United States? Give the East and West limits of longitude of the continental US and those for the Northern and Southern extent of the continent to the nearest degree. Which parallel defines much of the border between the United States and Canada? If we removed a vertical slice out of the world cut along the meridians defining the most Eastern and Western points in the continental United States, how much of the globe would we have cut out?
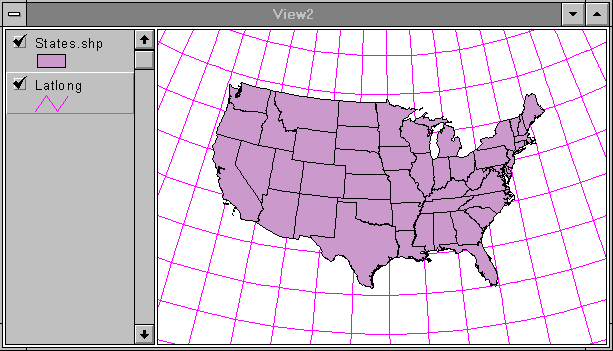
Create a new View, View2, and add avdata\world\Latlong and avdata\qstart\States.shp to the View as you did previously. Go to View/Properties and ensure that Map Units are labeled Decimal Degrees since the View that you are looking at is in Geographic Coordinates. Hit Projection, select Projections of the United States, and among the choices offered, select the Albers Equal-Area Conic projection.
Make a note of the Ellipsoid used and the projection parameters (Central Meridian, Reference Latitude, Standard Parallel 1, Standard Parallel 2, False Easting and False Northing).
Here is an example of the Albers Equal Area Projection of the United States
Separate View1 (Geographic Coordinates) and View2 (Albers Projection) and you will see that in geographic coordinates the United States appears to be wider and flatter than it does in normal projected coordinates. This does not occur because Canada is sitting on the USA and squishing us! This effect occurs because as you go northward, the meridians converge toward one another while the successive parallels remain parallel to one another. When you reach the north pole, the meridians converge completely.
If you take a 5 degree box of latitude and longitude, such as one of those shown in the views, the ratio of the East-West distance between meridians to the North-South distance between parallels is Cos (latitude) : 1. For example, at 30°N, Cos(30°) = 0.866, so the ratio is 0.866 : 1, at 45°N, Cos(45°) = 0.707, so the ratio is 0.707 : 1. In the projected Albers view (View2), the result is that square boxes of latitude - longitude appear as elongated quadrilaterals with a longer base than their top edge. In geographic coordinates, the effect of the real convergence of the meridians is lost because the latitude and longitude grid form a set of perpendicular lines, which is what makes the United States seem wider and flatter in geographic coordinates than it does in the more normal projected map coordinates.
Label the Views of the United States with the Character Tool (Labeled T in the lower tool bar). If your labeling is too small (the default is 14 point), use Window/ Show Symbol Palette to bring up the Palette, click on the button labeled ABC to get the Font Palette and then resize the lettering to perhaps 24 or 36 point. Label some of the main meridians and parallels in the geographic coordinate view.
Here is an example of the Layout of Projections of the United States
Make a printout of the Layout. Save the Project (File/Save Project As) so that you don't have to recreate it again later if you need it again.
To be turned in: A printout of the Layout showing the two views of the United States
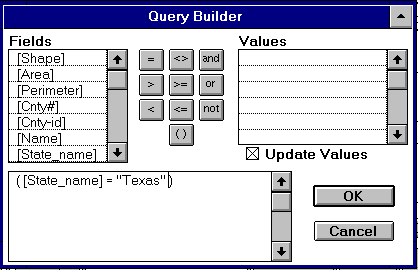
To select the counties which make up Texas, a special display of the counties theme can be set up as follows:
 (this hammer icon means "make a query of the theme").
([State_name] = "Texas")
If you don't have all the components of the query built correctly, hit Cancel in the Query Building window and start again to build the query.
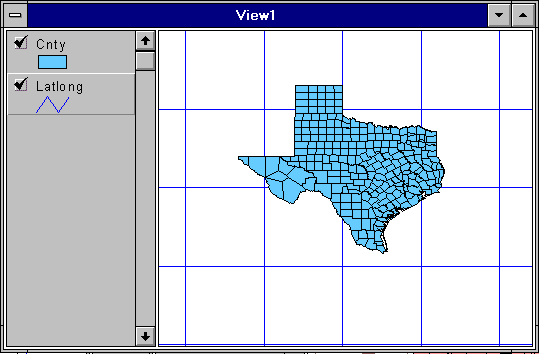
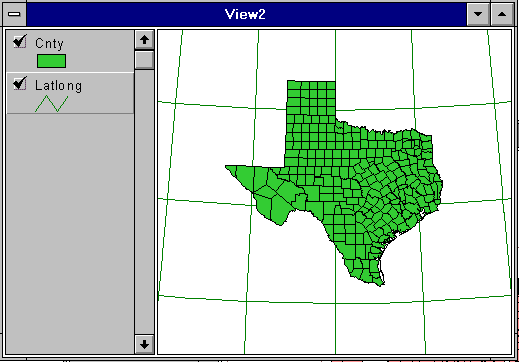
Here is an example of the Texas in Geographic Coordinates
The latitude/longitude grid displayed is at 5 degree intervals of latitude and longitude. To determine what latitude or longitude a particular line represents, highlight the theme latlong in the Legend bar and use the Information tool  in the tool bar. As you click on each line a small display window will give you the record of information about that line.
Create a new View (View2), add Latlong and Usa (Cnty) to it, and select the counties in Texas as before.
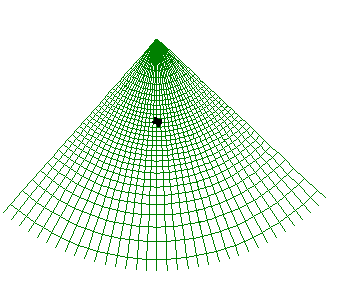
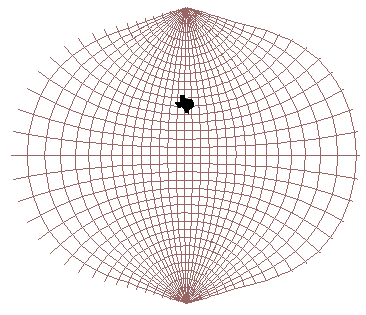
To view Texas in the Lambert Conformal Conic projection, highlight the Cnty theme, go to View/Properties, set the map units to Decimal Degrees, click on the Projection bar and in the Projection Properties window displayed, select Category: Projections of the United States, and Type: Lambert Conformal Conic (Conterminous U.S.). Click OK to the two display windows to transform the view to the projected domain. Notice how the meridians now fan out from an origin at the center of rotation of the earth (a consequence of using a conic projection centered on the axis of rotation of the earth). The display shown is that which would be produced by cutting the cone up the back side and unfolding the cone so that it lays flat on the table.
Here is an example of the Lambert Conformal Conic Meridians and Parallels
Texas is a dark dot in the center of the meridians. Use the Zoom tool to highlight the State. Notice that Texas appears to be tilted to the right slightly. This occurs because the Central Meridian of the projection use is 96W, which would appear as a vertical line in the display. Regions to the West of this meridian (most of Texas) appear tilted to the right while those to the East of this meridian appear tilted to the left.
Datum: North American Datum of 1983 (NAD83)
Ellipsoid: Geodetic Reference System of 1980 (GRS80)
Map units: meters
Central Meridian: 100°W (-100.0000)
Reference Latitude: 31° 10´ N (31.166667)
Standard Parallel 1: 27° 25´ N (27.416667)
Standard Parallel 2: 34° 55´ N (34.916667)
False Easting: 1000000
False Northing: 1000000
This means the standard parallels where the cone cuts the earth's surface are located at about 1/6 of the distance from the top and bottom of the State, respectively, and that the origin of the coordinate system (at the intersection of the Central Meridian and the Reference Latitude) is in the center of the State, to which the coordinates (x,y) = (1000000, 1000000) meters is assigned so that the (x,y) coordinates of all locations in the State will be positive.
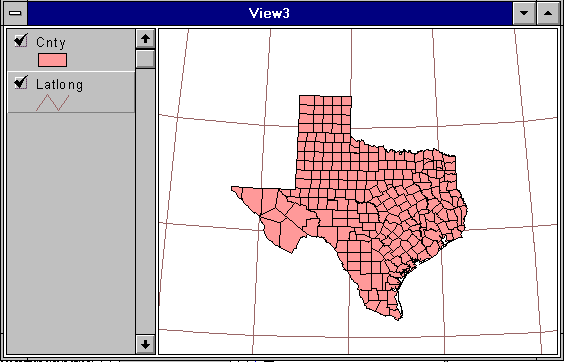
To transform the projection to Texas State Mapping System coordinates, highlight View2, to again to View/Properties, hit Projection and in Projection Properties, click Custom at the top of the form. You will see that the Ellipsoid now has ascroll bar, choose GRS 80; and type the parameters given above into the boxes beside each of the parameters in the form. Hit OK, OK, and Presto! you'll see the map of Texas transformed to a nice upright appearance!
Here is an example of the Texas State Mapping System Projection
Questions: What are the approximate width and length in km of Texas at its widest and longest points? What are the coordinates of El Paso, the farthest point in the West of Texas, in this coordinate system? What are the coordinates in this system of Brownsville, the most southern city in Texas? (Hint: Use the measuring tool in the lower tool bar of the View window to measure distance across Texas).
Create a new View, View3, in the Project and add Cnty and Latlong to the theme in the same manner as previously, selecting the counties of Texas using the Theme Properties window. Project the View into Universal Transverse Mercator projection by using View Properties/Projection Properties, under Category: select UTM, and under Type, select Zone 14. You will see a standard set of projection parameters displayed which include:
Projection: Transverse Mercator
Ellipsoid: GRS 80
Central Meridian: -99.00000
Reference Latitude: 0.00000
Scale Factor: 0.99960
False Easting: 500000
False Northing: 0.00000
These parameters mean that the Central Meridian of Zone 14 is at 99°W so that it covers from 96°W to 102°W; the Reference Latitude is 0.0000 (the equator, which is 0°N); the origin of the coordinate system is at the intersection of the Central Meridion with the Reference Latitude and thus is at (0°N, 99°W), where the coordinates are (x, y) = (500,000, 0) m. The false Easting of 500,000m is to ensure that all points in the zone have positive x coordinates. The y-coordinates are always positive in the Northern hemisphere because 0 is at the equator. In the Southern Hemisphere, a false Northing of 10,000,000m is applied to ensure that the y-coordinate is always positive.
The Scale Factor of 0.9996 means that along the Central Meridian, the true scale of 1.0 is reduced slightly so that at locations off the true meridian the scale factor will be more nearly 1.0 (the Transverse Mercator projection distorts distance positively as you move away from the Central Meridian).
Click, OK, OK, to see the projection applied. The pattern of meridians and parallels looks strange, converging at top and bottom of the picture, which correspond to the North and South Poles, respectively. When you zoom in on Texas, the map of the State looks much as it did in the Texas State Mapping System using the Lambert Conformal Conic projection.
Here is an example of the Texas in the UTM Projection, Zone 14
Questions: How many UTM zones does it take to cover Texas? Which zone applies in West Texas? Central Texas? East Texas?
Label the Views of Texas with the Character Tool (Labeled T in the lower tool bar). If your labeling is too small (the default is 14 point), use Window/ Show Symbol Palette to bring up the Palette, click on the button labeled ABC to get the Font Palette and then resize the lettering to perhaps 24 or 36 point. Label some of the main meridians and parallels in the geographic coordinate view.
Here is an example of the Layout of Projections of Texas
Make a printout of the Layout. Save the Project (File/Save Project As) so that you don't have to recreate it again later if you need it again.
To be turned in: A Layout showing Texas in geographic coordinates and in the two map projections.
Feel free to be creative and expand on what I've suggested in the direction of your own interests. Another one done!!