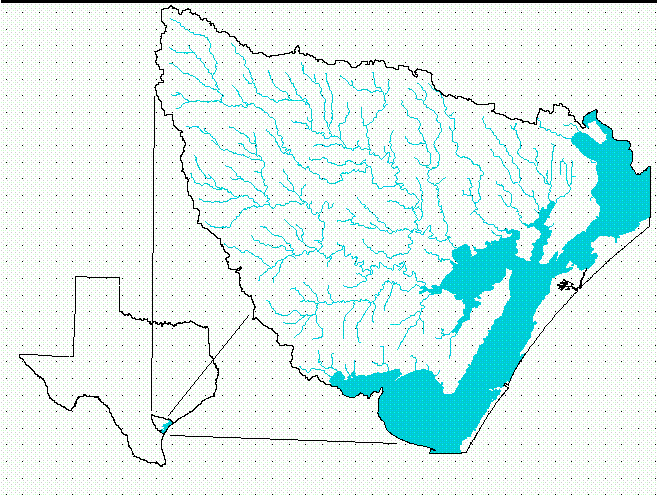
The purpose of this exercise is to show how the Arc/Info GRID system can be used to provide estimates of nonpoint source pollutant loads to a receiving body of water. For this exercise, the receiving water is Copano Bay in South Texas, which the Aransas River, Mission River, and Copano Creek all drain into. These streams are all contained within the San Antonio-Nueces coastal basin, a 7000 sq km basin which is bounded by the San Antonio River and Nueces River basins (hence the name).
You will use a coverage of land uses in the basin and associate Estimated Mean Concentration (EMC) values of various pollutant constituents with those land uses. Then, for some selected pollutants, you will create an EMC grid and multiply it by a grid of average annual rainfall runoff in the basin. The result will be the annual loading of the constituent to each grid cell in the basin, i.e.
Finally, you'll perform a flow accumulation on the cell-based loads to determine average annual loads at the outlets to Copano Bay.
All the data needed for the exercise is also available via anonymous ftp from ftp.crwr.utexas.edu/pub/gisclass/ex5. Instructions on how to use anonymous ftp. All the coverages are in export format so you will need to import them using the arc IMPORT command.
This part of the exercise is intended for you to = familiarize yourself with the region in which you'll be working. Logon to an Alpha and, at the $ prompt, make a directory for this exercise:
$: mkdir ex5
$: cd ex5
$: arc
Copy the filled DEM, and coverages of the basin border, stream network, bay network, and sub-basin watersheds from my directory:
Arc: copy /res2/maidment/nonpoint/sanfil sanfil
Arc: copy /res2/maidment/nonpoint/sanbord sanbord
Arc: copy /res2/maidment/nonpoint/streams streams
Arc: copy /res2/maidment/nonpoint/sanbays sanbays
Arc: copy /res2/maidment/nonpoint/arabasin arabasin
Arc: copy /res2/maidment/nonpoint/misbasin misbasin
Arc: copy /res2/maidment/nonpoint/copbasin copbasin
Check out the DEM of the region:
Arc: grid
Grid: display 9999
Grid: mape sanfil
Grid: gridpaint sanfil value linear nowrap gray
You can see in the gray shaded image, the Nueces River to the South and the San Antonio River to the North, both flowing into the Texas coastal waterways to the East. The San Antonio - Nueces basin which we are going to study in this exercise is the drainage area lying between the outlets of the Nueces and San Antonio Rivers.
Now, lets take a look at some cell elevations within the grid:
Grid: cellvalue sanfil *
<9 to END>
When you move the cursor to the graphic window, you'll see some cross hairs appear. Click on some points on the grid, e.g.:
The cell containing point (1237346.832,704096.141) has value 55.000
The cell containing point (1239301.844,681613.505) has value 28.000
The cell containing point (1249402.739,671186.782) has value 18.000
The cell containing point (1213235.024,708331.999) has value 91.000
The cell containing point (1205089.141,722017.078) has value 121.000
Type 9 on the keyboard (with the cursor positioned over the display) to exit this operation.
Grid:
Now lets describe this grid:
Grid: describe sanfil
Make note of the following: grid cell-size, elevation range in the basin, and the projection. The parameters of this projection define what is known as the Texas State Mapping System (TSMS).
To Be Turned In: What is the cell size of the grid? Now many rows and columns does the grid have. What is the total number of cells in this grid? What land surface area is covered by this grid?
Now overlay the basin border, stream network, and bay network:
Grid: linecolor 2
Grid: arcs sanbord
Grid: linecolor 4
Grid: arcs streams
Grid: polygonshades sanbays 4
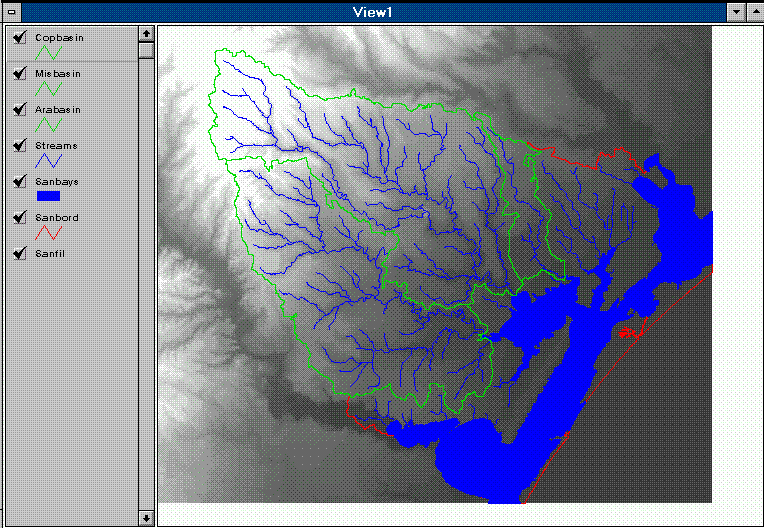
Note that Copano Bay is the interior bay that is enclosed almost all the way around. It looks somewhat like a hammer head. The stream network was created using the watershed delineation process that you used in Exercise 2. The threshold value for this particular network was 8000 cells. The basin border was created by delineating all the subwatersheds in the basin, converting those grids to coverages (using the gridpoly command) and then combining the coverages with the Arc/Info mapjoin command. The 3 largest streams that drain to Copano Bay are the Aransas River, Mission River, and Copano Creek. Now check out each of these drainage basins:
Grid: linecolor 3
The Aransas River Basin:
Grid: arcs arabasin
The Mission River Basin:
Grid: linecolor 5
Grid: arcs misbasin
The Copano River Basin:
Grid: linecolor 7
Grid: arcs copbasin
Now that you've gotten your bearings on where you'll be working, kill off the DEM and free up some space in your work area:
Grid: kill sanfil all
Grid: quit
Arc: copy /res2/maidment/nonpoint/anprecip anprecip
Arc: grid
Grid: mape anprecip
Grid: gridpaint anprecip
Grid: describe anprecip
The painted version of this grid is not too informative, just a set of colored squares. We'll make a better version in Arcview later. The size of these squares is approximately 5 km. From this description of the grid, you can identify the range of precipitation values (min to max) over the basin. Note that the units of these values are in millimeters/year. Also verify cell-size and projection of the grid to check its compatibility with the DEM.
To Be Turned In: What is the range of the precipitation across the basin in mm/yr? What is the basin mean precipitation (mm/yr). What are the corresponding values in in/yr? What grid cell size and map projection are used?
Now create a polygon coverage of this grid. You'll need this to establish precipitation intervals for mapping in ArcView. In typing Grid commands, the target grid to be created is on the left hand side of the = sign, then to the right of the = sign comes the Grid function, and then the grids and parameters that are inputs to this operation. It seems to help the system interpret the command sequence if you leave spaces around each element of the command, as shown below:
Grid: raincov = gridpoly ( anprecip )
At any time in Grid or Arc, you can check what coverages you have with the commands lc (Listcoverages), and lg (Listgrids). For example at this point in the exercise, you have:
Grid: lc
 Available Coverages
 -------------------
  ARABASIN          COPBASIN          MISBASIN          RAINCOV
  SANBAYS           SANBORD           STREAMS
Grid: lg
 Available GRIDs
 -------------------
  ANPRECIP
Quit out of Grid and Arc/Info and fire up ArcView.
Grid: quit
Arc: quit
When you run an application in Unix, you can type &
after the function
and has the effect of allowing this function to be put in background later
so that you can run a second process from the same window. Lets start
up Arcview in this way:
$: arcview &
Open a new View and add the themes raincov (polygon) and sanbord (arc)
from your /ex5 directory, using the  button. When
the themes show up in the legend of the view, double click on the raincov
symbol (rectangle) to bring up the Legend Editor window. In the Legend
Editor, click on the arrow to the right of the Field line
button. When
the themes show up in the legend of the view, double click on the raincov
symbol (rectangle) to bring up the Legend Editor window. In the Legend
Editor, click on the arrow to the right of the Field line
 to select a different field through which to
view the raincov theme. Scroll down and select grid-code; this is the
field that contains the annual precip value from the grid that you just
converted. You should see 5 ranges of precipitation values in shades
from white to black:
to select a different field through which to
view the raincov theme. Scroll down and select grid-code; this is the
field that contains the annual precip value from the grid that you just
converted. You should see 5 ranges of precipitation values in shades
from white to black:

Click on the  box. Now click on the first range of
values to the right of the white symbol. The range will become
"black lit". You may now change the effective range for the
white symbol. Follow this procedure to change all of the ranges so that
they run from the minimum to the maximum precip values from the grid.
For example:
box. Now click on the first range of
values to the right of the white symbol. The range will become
"black lit". You may now change the effective range for the
white symbol. Follow this procedure to change all of the ranges so that
they run from the minimum to the maximum precip values from the grid.
For example:
Click on the  box and change the ranges of labels
to correspond to the Value changes that you just made. Now use the Legend
Editor to change the
color scheme of raincov to get a ramped effect by clicking in the top
box and selecting a light blue color, the bottom box to select a dark
blue color, and then hitting the Ramp button. You'll see the intermediate
boxes change their colors to grade between the colors of the top and
bottom boxes. When you are finished, select
box and change the ranges of labels
to correspond to the Value changes that you just made. Now use the Legend
Editor to change the
color scheme of raincov to get a ramped effect by clicking in the top
box and selecting a light blue color, the bottom box to select a dark
blue color, and then hitting the Ramp button. You'll see the intermediate
boxes change their colors to grade between the colors of the top and
bottom boxes. When you are finished, select  in the Legend Editor window and then close both the Legend Editor and
Fill Palette. Finally, select
in the Legend Editor window and then close both the Legend Editor and
Fill Palette. Finally, select  the raincov and
sanbord themes in the View Legend. You should be able to easily see
the distribution of annual precipitation in the San Antonio-Nueces
Basin.
the raincov and
sanbord themes in the View Legend. You should be able to easily see
the distribution of annual precipitation in the San Antonio-Nueces
Basin.

Save the project so if you have a crash you don't have to recreate it later.
Now click on the top of the ArcView window and select minimize -- the
little dot in the box in the top right hand corner (NOT
close, which is the box next to it.). The ArcView window will be
minimized to an icon
 on your Alpha workspace.
$: arc
Arc: grid
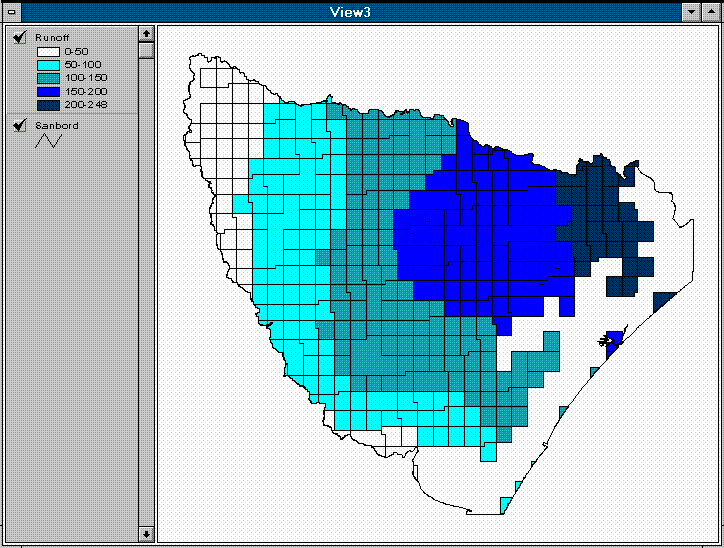
Grid: runoff = 1.0527 * anprecip - 799.37
Make sure that you leave spaces BEFORE AND AFTER each of the operators (i.e. =, *, -) in this equation.
Grid: display 9999
Grid: mape runoff
Grid: gridpaint runoff
Now use the cellvalue command to investigate values of runoff throughout the basin:
Grid: cellvalue runoff *
A cursor with crosshairs will appear on the Grid. With the cursor, click on a number of different locations in the basin to identify values of average annual runoff at those points. What happens when you click on a location in the very northwestern edge of the basin?? Based on the above linear relationship, negative values of runoff occur for any precipitation value less than or equal to 759 mm/yr. Since the concept of negative runoff is meaningless, you need to correct the runoff grid for these cases. But first, type 9 with the cursor positioned over the Grid to get back to the Grid prompt.
Grid: kill runoff all
Grid: runoff = con(anprecip > 759, 1.0527 * anprecip - 799.37, 0)
Essentially this con-ditional statement says "For every cell in the anprecip grid that has a value > 759, apply the rainfall/runoff function to create the new runoff grid. Store values of 0 in the rest of the runoff grid cells."
Now, repaint the runoff grid and use the cellvalue command again to verify that only non-negative values occur in the new runoff grid.
If at any time, you want to clear the screen and repaint some coverages, you can use Grid: clear to clear the screen and then repaint it.
Grid: gridpaint runoff
Grid: arcs sanbord
Grid: cellvalue runoff * (return to Grid prompt by typing 9)
The int statement returns the integer values of each of the runoff cell values. You'll need to do this before creating an equivalent coverage.
Grid: irunoff = int(runoff)
Grid: describe irunoff
To Be Turned In: What is the mean runoff from the basin (mm/yr)? What is the range in the runoff (mm/yr)?
Create the equivalent coverage of the irunoff grid, using the gridpoly command, as before:
Grid: runoffcv = gridpoly(irunoff)
Grid: kill anprecip all
Grid: kill irunoff all
Now double-click on the ArcView icon
on your Alpha workspace to restore the Arcview Project that you
previously created. If you have closed Arcview, restart it and load
the project that you saved previously.
In a new View, add runoffcv (polygon)
and sanbord (arc) as themes. As before, select grid-code in the
Legend Editor as the field through which to display the theme,
and change the Value and Label ranges to reflect approximately
equal intervals between the minimum and maximum runoff grid values.
Change the color scheme of the theme and
all of your changes. Close the Fill Palette and Legend Editor and
select the runoffcv and sanbord themes to
view the runoff distribution in the basin.
Minimize the ArcView window when you are done.
To Be Turned In:
$ cp /res2/maidment/nonpoint/lanuses.e00 lanuses.e00
$ cp /res2/maidment/nonpoint/emc.txt emc.txt
$ cp /res2/maidment/nonpoint/emca.dat emca.dat
Use the Unix command ls to check that you have got all the files:
alpha62:ce397m:/class/ce397m/ex5$ ls
arabasin/      info/          nonpoint.htm   runoffcv/
copbasin/      lanuses.e00*   precip.apr     sanbays/
emc.txt*       log*           raincov/       sanbord/
emca.dat*      misbasin/      runoff/        streams/
Import the land use coverage from the .e00 file.
Arc: import cover lanuses lanuses
Importing lanuses from interchange file lanuses.e00...
Delete the interchange file to save space. This rm command is executed from within Arc but it drops back to the basic Unix system to be executed because Arc has no rm function:
Arc: rm lanuses.e00
Submitting command to Operating System ...
Then call up Arcplot to view the coverage:
Arc: arcplot
Arcplot: display 9999
Arcplot mape lanuses
Arcplot: arcs lanuses
Wow! A pretty detailed coverage. Notice that the parallels and meridians intersect some of the landuse polygons. These lines arise from the fact that a number of maps were joined to form the coverage that you see here. You can get rid of the parallels and meridians by using the Arc/Info dissolve command. This command removes all arcs separating polygons with equal values for a particular attribute:
Arcplot: quit
Arc: dissolve lanuses luse lanuses-id poly
Don't worry if you see some error statements here. They don't seem to be
fatal.
Make note of the 4 arguments in the dissolve command.
What this command says is:
(1) dissolve the coverage
lanuses to create a new coverage called luse.
(2) Use the coverage
attribute lanuses-id as the item to decide which arcs to remove. Arcs are
removed between any two polygons which have the same lanuses-id.
(3) Define the new coverage as a polygon coverage.
Now view the dissolved coverage in Arcplot:
Arc: arcplot
Arcplot: mape luse
Arcplot: arcs luse
You'll see that nearly all the straight map borders have been dissolved. Overlay the San Antonio-Nueces Basin border:
Arcplot: linecolor 2
Arcplot: arcs sanbord

For this study, we are only interested in the land uses within the basin boundary. The land uses outside of this boundary can be trimmed away using the clip command:
Arcplot: quit
Arc: clip luse sanbord sanlu poly (this may take a couple of minutes.
Don't worry about error messages about output conversion errors as they
don't seem to be fatal)
This clip command uses the sanbord polygon coverage as a "cookie cutter". In English, this command says, "Clip the luse coverage with the sanbord template to create the sanlu coverage which is made up of polygons." Now, lets free up some file space.
Arc: kill luse all
Arc: kill lanuses all
Double-click on the ArcView icon, or quit from
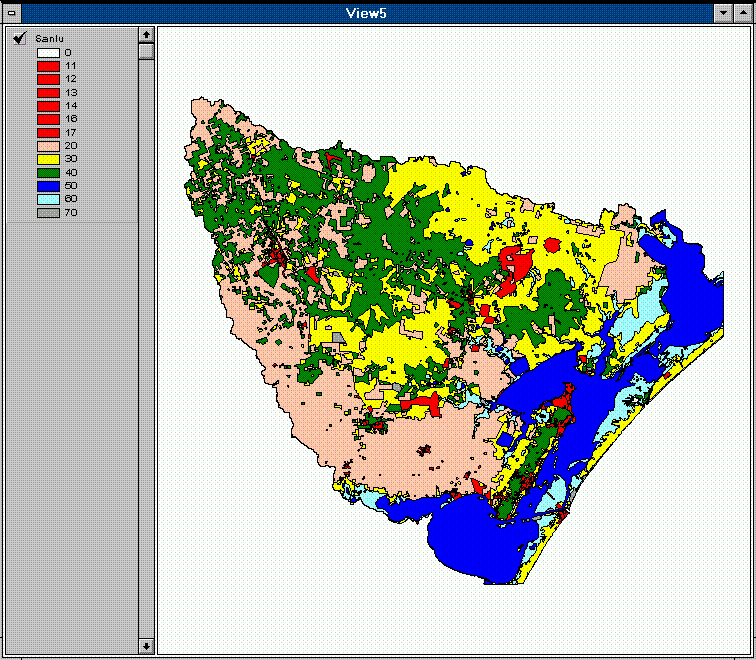
Arc and open Arcview if necessary, and, in a new View, add sanlu (polygon) as
a theme. Double-click on the sanlu theme symbol (rectangle) and, in the
Legend Editor, select lanuses-id as the field through which to display the
theme. Now, click on the  box and, instead of the
Quantile selection, choose
box and, instead of the
Quantile selection, choose  and
and  .
You will see that each of the lanuses-id values gets its own symbol. These
lanuses-id values correspond to the Anderson Land Use Codes.
.
You will see that each of the lanuses-id values gets its own symbol. These
lanuses-id values correspond to the Anderson Land Use Codes.
The Anderson land use classification system has level 1 categories of which the ones we see in this base are: 1 = urban, 2 = agriculture, 3 = rangeland, 4 = forest, 5 = water, 6 = wetlands. The second digit distinguishes subcategories of these principal categories, e.g. 11 = urban resident, 12 = urban commercial, 13 = urban industrial, etc. More information about the land use/land cover files is contained in our GIS Hydrology Home Page.
Use the Fill Palette to color-code each of the symbols into land use categories. The following color scheme works pretty well, but feel free to use your own:
	0 	Unknown 	White (or transparent)
	10-17 	Urban  		Red
	20-24 	Agriculture 	Tan
	30-33 	Rangeland 	Yellow
	40-43 	Forestland 	Green
	50-54 	Water  		Medium Blue
	60-62 	Wetlands 	Light Blue
	70-76 	Barren  	Gray
Close the Fill Palette and select in the Legend Editor
before closing it. Now select the sanlu theme in your
view and note where all the different land use categories in the basin are. Save the
project for future use. Minimize the ArcView window when you are done.
Now you are going to associate Estimated Mean Concentration (EMC) values of various pollutant constituents to the land use types. The Natural Resources Conservation Service of the US Dept. of Agriculture (USDA-NRCS) has provided us with a table of some EMC values for 18 different constituents. You can view this table by bringing up a text editor window and loading the emc.txt file that you previously downloaded from my area.
The values in this table are typical concentrations of pollutants found in
runoff water from each particular land use. The values are compiled from
many field studies done by the US Geological Survey and other organizations.
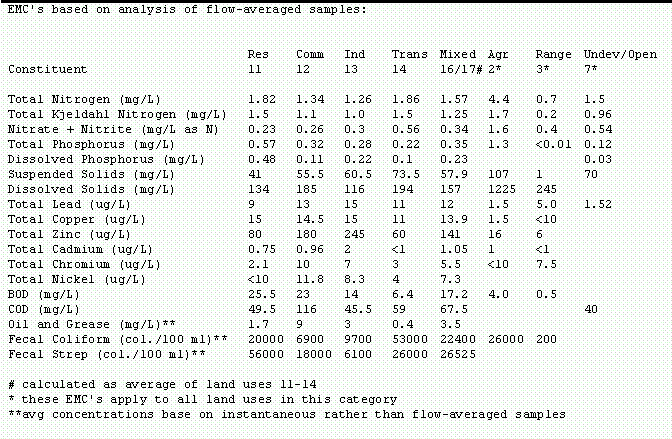
Expand the text editor window so that all columns in the table are visible. Note that there are different EMC values for each of the Urban Land Use codes (residential, commercial, industrial, transportation, mixed) but only one EMC value for the Agriculture, Rangeland, and Barren Land Use categories. In addition to this table, we will use the Rangeland EMC values for Forest Land Uses. When you are done viewing this table, minimize it.
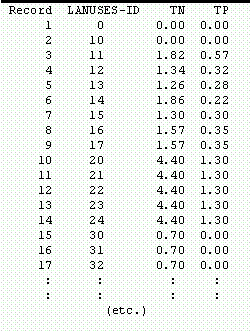
For this exercise, we will be interested in estimating annual loadings of nutrients to the Copano Bay, so we will limit this study to Total Nitrogen and Total Phosphorus. Open a new file emca.dat in the text editor. This is an edited version of the emc table that you previously viewed which has three columns of numbers representing, respectively: lanuse-id, total nitrogen, and total phosophorus.
You'll need to join these EMC values to the sanlu polygon attribute table in order to associate them with land use. From the Arc prompt, open the Tables module and define the following attribute data fields in a new table called attrib.dat. If necessary, start up Arc and then:
Arc: tables
Enter Command: define attrib.dat
1Item Name: lanuses-id
5Item Name: tn (total nitrogen)
10Item Name: tp (total phosphorus)
15Item Name: <return>
This completes the definition of the table. To check that you got your table created correctly, you can look at the directory of available tables:
Enter Command: dir
 TYPE NAME                            INTERNAL NAME    NO. RECS LENGTH EXTERNL
------------------------------------------------------------------------------
  DF  ATTRIB.DAT                        ARC0000DAT          47      14
  DF  SANBORD.TIC                       ARC0002DAT           4      12    XX
  DF  SANBORD.AAT                       ARC0003DAT          49      60    XX
  DF  SANBORD.BND                       ARC0004DAT           1      16    XX
etc ....
To list the items in this table:
Enter Command: select attrib.dat
0 Records Selected.
[There are no records selected because you have not entered the data yet]
Enter Command: items
COLUMN   ITEM NAME        WIDTH OUTPUT  TYPE N.DEC  ALTERNATE NAME     INDEXED?
    1  LANUSES-ID             4     5     B      -                        -
    5  TN                     5     5     N      2                        -
   10  TP                     5     5     N      2                        -
Adding Data to the Table from an External File:
Now you have a table template created to which data can be added. The values from the table have been prepared in a data file for you (emca.dat). You can just fill these values into the new table using the "add from" command in tables:
Enter Command: add from emca.dat
Real value expected. (don't know why this occurs)
Enter Command: quit
Arc: list attrib.dat
You should see a table with one land use type per record and EMC values for Nitrogen and Phosphorus associated with each land use type.
Check these values against the table emc.txt to verify their accuracy. Now use the joinitem command to join these EMC values to the appropriate polygons in the sanlu coverage:
Arc: joinitem sanlu.pat attrib.dat sanlu.pat lanuses-id lanuses-id
Joining sanlu.pat and attrib.dat to create sanlu.pat
In English, this command says, "join the sanlu polygon attribute table (pat) with the corresponding data from the attrib.dat table, creating a new sanlu.pat table. Use the lanuses-id field as the item with which to relate the items from the two tables, and add the new data after the lanuses-id field in the sanlu attribute table."
Now list the attributes of the sanlu polygon attribute table:
Arc: items sanlu.pat
Your result should look like this:
COLUMN   ITEM NAME         WIDTH OUTPUT  TYPE N.DEC  ALTERNATE NAME     INDEXED?
    1   AREA                  4    12     F      3                        -
    5   PERIMETER             4    12     F      3                        -
    9   SANLU#                4     5     B      -                        -
   13   SANLU-ID              4     5     B      -                        -
   17   LANUSES-ID            4     5     B      -                        -
   21   TN                    5     5     N      2                        -
   26   TP                    5     5     N      2                        -
Now use ArcView to look at a map of EMC values in the basin.
Double-click on the ArcView icon in the Alpha
workspace. In a new View, add sanlu as a theme. Double-click on the
sanlu theme symbol and, in the Legend Editor, select tp as the field
through which to view the theme. Click on the
box and select and , as before.
You may want to use the Fill Palette to ramp from a light color for 0 mg/L
to a darker color for the Max EMC. For example:

Again, close the Fill Palette and your changes
from the Legend Editor window. Select the sanlu
theme in your new View to get a look at the Phosphorus EMC map for the San
Antonio-Nueces basin.
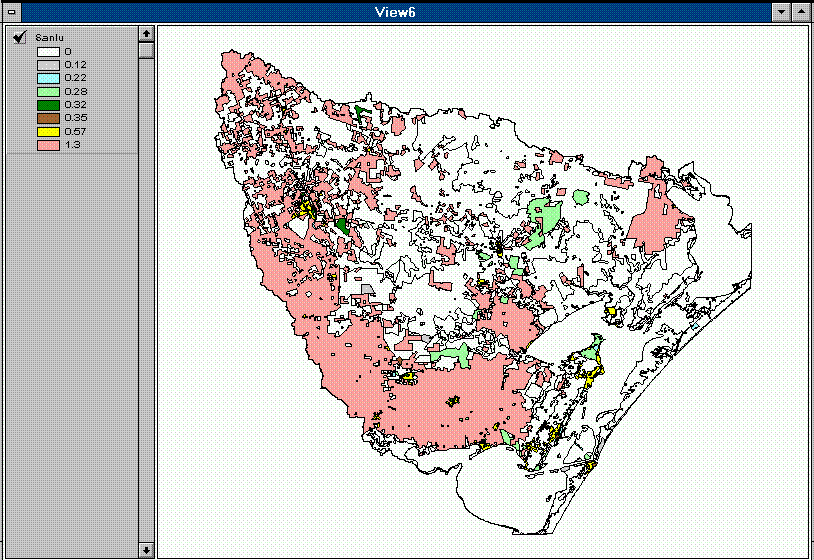
Notice the large area in the north of the basin that contributes 0 mg/L of Total Phosphorus. This corresponds to forest and rangeland land uses which don't contribute much phosophorus to runoff because fertilizers are applied to this land and it is not disturbed by land cultivation. The main nonpoint source of phosophorus is from the agricultural lands in the South side of the basin. There can also be significant point sources of phosophorus from municipal treatment plant effluent.
Create a new View, add Sanlu (poly) to it again, and make a Nitrogen EMC map using the same procedure, but using the tn field through which to view the theme. You'll see that in this map, there are nonpoint sources of nitrogen from all land uses with more from the agricultural areas than from the range and forest lands. Minimize the ArcView window.
To Be Turned In: A map showing the expected mean concentration of phosphorus in runoff.
Arc: copy /res2/maidment/nonpoint/sanfdr sanfdr
Arc: grid
In order to perform this analysis, you'll first need to convert your EMC maps to equivalent grids. Just as you used the gridpoly command to create equivalent polygon coverages from grids, you can create grid representations of coverages using polygrid:
Grid: phosgrid = polygrid(sanlu,tp,#,#,100)
With this command, you are specifying to use the tp item to define the values of the grid cells. You are also specifying to create a grid of cell-sizes = 100 m. Now determine the annual Phosphorus loading contribution from each cell in the grid by multiplying your runoff grid by your EMC grid:
Grid: phosld = phosgrid * runoff
Grid: kill phosgrid all
Accumulate these cell-based values for annual Phosphorus load to determine downstream values of average annual loads:
Grid: phosfac = flowaccumulation(sanfdr,phosld)
This command is what is known as a WEIGHTED flow accumulation. This is an extension of the regular flowaccumulation command which uses the flow direction grid to count the number of cells upstream of each particular cell in the grid. It then stores that particular count as the value for that cell. For the WEIGHTED flowaccumulation command, a weight grid (in this case, phosld) is used and t he SUM of the values in the cells upstream of a particular cell is what is stored as the value of that cell.
Grid: kill phosld all
Grid: phloadkg = phosfac / 100
This step is necessary to get the resultant load grid in units of kilograms.
The conversion constant of 100 comes about because the input units are
mm/yr for runoff and mg/l for concentration, the output units are kg/yr
for loading, there are 1,000,000 mg / kg, and each cell has 10,000 m2 area.
Load = Runoff * Concentration * Cell Area (1)
where the cell area is 10,000 m2.
To Be Turned In: A units analysis of the above formula to show
why dividing the product of the load and concentration grids by 100 leads
to the correct units for the loading (kg/yr).
Grid: kill phosfac all
Use this describe command to identify the maximum value for average annual phosphorus loading on the grid. Also, note that the values in the grid are real number values. Later, you'll need to convert parts of this grid to coverages, which will require the grid to be an integer grid. Go ahead, now and convert the real # grid to an integer grid:
Grid: display 9999
Notice that, for the Aransas sub-basin, there are actually 3 streams that
drain into Copano Bay in close proximity to each other. The northernmost
of these streams is the Aransas River and, proceeding south, the other
streams are Chiltipin Creek and Taft Creek. This subwatershed boundary was
constructed by delineating the watersheds for each of the 3 streams and then
merging the resultant grids.
Now comes the fun part! We are going to identify the phosophorus loads
coming into Copano Bay from the different rivers.
Use the Pan/Zoom feature of the GRID display window to create a
zoomed view of the Aransas basin outlet. From the main GRID window,
click on Pan/Zoom and select Create. A cursor with crosshairs will show up
on the window. Click once just a little to the northwest of where the
subwatershed outlet is. Then, as you move the cursor to the southeast,
a small box will form. When the cursor is just a little to the southeast
of the watershed outlet, click again. Make the expanded View window
as large as you can in your workspace and then repaint the load grid.
Grid: gridpaint phosload value linear nowrap gray
Wow! Pretty cool! Now you can see the individual cells in the river
as they enter the bay. Lets check the load from the outlet:
Grid: cellvalue phosload *
With the cursor, click on the outlet cells and read off the value that
is given there. You should get a number between 9,000 and 70,000 kg / yr
depending on which outlet you choose. Click on a few places in the stream
going upstream and see how the load accumulation increases going downstream,
and how it jumps when you go past a tributary. Type 9 on the key board
to exit when necessary.
Repeat this exercise for each of the five principal stream outlets to the
bay (3 in the Aransas basin, 1 each in the Mission and Copano Basins).
Which stream contributes the most? What does this say about which land uses
contribute the most to phosphorus loading through rainfall runoff?
To Be Turned In: A listing showing the 5 streams and their
respective phosophorus loadings.
Close each of the expanded View Grid windows and repeat this analysis for
Nitrogen. To do this, you are going to write a small Arc Macro Language
Program (AML). This is a list of the commands that you would type
one by one at the keyboard which is stored in a text file so that
they can all be executed in a sequence without having to be individually
entered. For this procedure, open a text editor window and enter the
following text:
Remember to hit <return> after typing &return. Save
the file in your local working directory as load.aml.
Now you can invoke this AML from the grid prompt as:
Grid: &run load.aml (this will take some time to complete)
Use Pan/Zoom to create expanded Views of the subwatershed outlets:
Grid: gridpaint nitload value linear nowrap gray
To Be Turned In: Nitrogen loadings from each subwatershed.
Now lets liberate some file space!
Grid: kill runoff all
Close each of the expanded View Grid windows when you are done.
From the above Grid analyses with phosload and nitload, it is evident
that the largest accumulated nutrient loadings occur within the stream
networks. One method for visualization of the loadings distribution in
the basin is to convert grid cells whose values exceed certain threshold
values to equivalent arc coverages. For example, the largest load value
in the phosload grid is approximately 60,000 kg/yr. By setting a threshold
value of, say, 50,000, the stream reaches where the greatest loadings occur
can be identified:
Grid: maxload = con(phosload > 50000,1)
This command stores a 1 in maxload cells that correspond to phosload cells with values > 50,000. The rest of the maxload cells get a value of NODATA. This string of cells can be converted to an arc coverage by using the gridline command:
Grid: phld50k = gridline(maxload)
Further, these 2 commands can be combined by substituting the equation for maxload into the equation for phld50k ....
i.e. phld50k = gridline(con(phosload > 50000,1))
Now, create arc coverages for other loading threshold values. Lets do this
with an aml called line.aml:
Type in a text editor window:
Grid: &run line.aml
Check to see if you have got the new coverages:
Grid: lc
You can use ArcView to represent the loadings distribution in the basin,
using these newly created arc coverages. Click on the ArcView icon
Select
Minimize the ArcView window when you are done.
To Be Turned In: A map showing the phosophorus loadings in the basin
Perform the same type of loadings distribution visualization analysis for the
nitload grid:
Grid: describe nitload
Use this command to identify the value of the maximum nitrogen loading
from the basin. Select interval threshold values in multiples of 100,000.
Below 100,000, select the same threshold values as for phosphorus. Use an
AML created in the text editor to do this step:
To Be Turned In: A map showing nitrogen loadings from the basin
The final step in this study allows for a reasonably accurate prediction
of constituent concentrations from nonpoint sources (i.e. rainfall runoff)
throughout a watershed.
The phosload and nitload grids that you've created represent annual
accumulated mass of constituent (i.e. total mass/yr). In order to get
units of concentration from this quantity, one would need to divide by
total volume/yr (or accumulated runoff). The annual cumulative runoff
grid can be created by performing a WEIGHTED flow accumulation, using
runoff as the weight grid. However, since you've already
killed off both the runoff and sanfdr grids, you'll need to get them
back from my account first:
Grid: quit
Now lets get an accumulated runoff grid:
Grid: runacc = flowaccumulation(sanfdr,runoff) * 10
Since the runoff grid carries units of millimeters/yr, the "
* 10" is necessary to produce an output grid with units of cubic
meters/yr because each runoff unit comes from a 10,000 m2 cell and 1000 mm
= 1 m.
Now you can create a phosphorus concentration grid by dividing the annual
cumulative phosphorus load grid by the annual cumulative runoff grid.
Note that this would produce a grid with units of kg/cubic meter.
In order to produce a grid with the more traditional mg/L units, the
concentration grid should be multiplied by 1000 to convert kg/m3 to mg/l:
Grid: kill sanfdr all
This is a large grid with values in every cell. Since concentration measurements are generally made in-stream, a grid of concentrations specific to the San Antonio-Nueces stream network will be useful for comparison purposes:
Grid: strmgrid = linegrid(streams,#,#,#,100)
Here you have created an equivalent 100m X 100m grid of the stream network
coverage and then created a grid of the concentrations within the cells
of the stream grid. Perform a describe on the phconstr grid in order to
assess the range of concentrations in the grid:
Grid: describe phconstr
You can visualize the distribution of concentrations in the basin by
using the same process as from above for loadings:
Grid: phcon10 = gridline(con(phconstr > 1.0,1))
Use ArcView to represent the concentration distribution in the basin,
using these newly created arc coverages. Click on the ArcView icon
Using the Fill Palette, select light to dark shades of green for the 3 lowest
concentration ranges, yellow for the highest concentration range, light blue for the streams coverage, and some kind
of blue for sanbays.
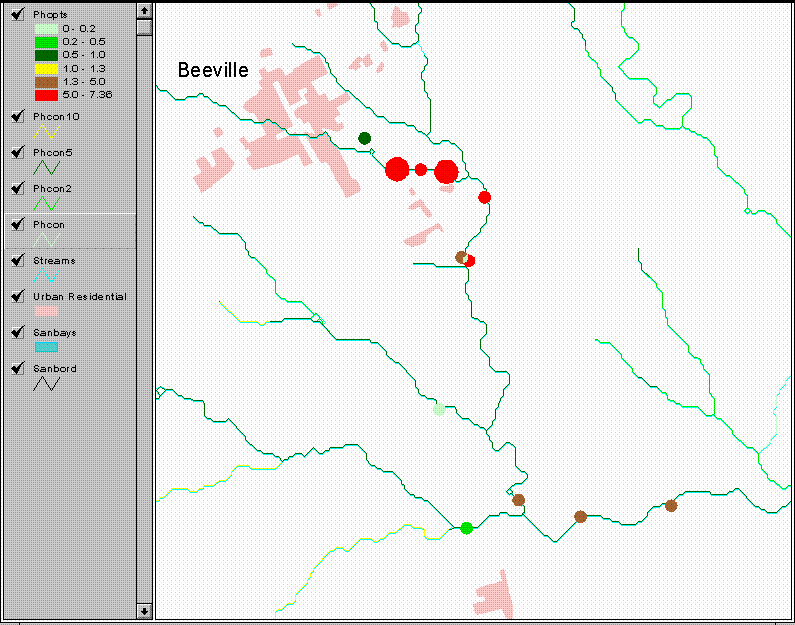
This phopts coverage was provided by the Texas Natural Resource Conservation
Commission (TNRCC) and includes a number of actual measurement locations
within the San Antonio-Nueces basin. The coverage also includes values
of average concentration for various pollutant constituents measured
over a 10 year time span between 1985 & 1995.
Double-click on the phopts symbol in the legend of the View and,
in the Legend Editor, select tp_avg as the field through which to
view the theme. Click on the
Using the Fill Palette, reshade the first 4 ranges to correspond to the
shades of green/yellow that you previously selected for phcon, phcon2, phcon5 & phcon10.
Reshade the other 2 ranges as shown in the example Legend Editor above.
Click on
Notice that the sampling locations are depicted by different sized dots.
The area of each dot is meant to be directly proportional to the relative
number.Also note the high measured levels of phosphorus in the upper Aransas basin
as compared with predicted concentrations there.
Further consultation with TNRCC about this inconsistency revealed that a
wastewater treatment facility effluent (point source) contributed
significantly to nutrient loadings in that area. This assessment
method does not currently account for point source contributions.
To Be Turned In:A map showing the computed and observed concentrations
of phosphorus
If you've been killing grids and coverages along the way, then
your clean
up should proceed as follows:
Grid: kill phopts all
Ok, you're done!
Grid: describe phloadkg
Grid: kill phloadkg all
Now, display the grid and use the cellvalue command to determine the average annual phosphorus loadings at the major stream outlets to Copano Bay:
Grid: mape phosload
Grid: gridpaint phosload value linear nowrap gray
Grid: linecolor 2
Grid: arcs arabasin
Grid: arcs misbasin
Grid: arcs copbasin
nitgrid = polygrid (sanlu,tn,#,#,100)
nitld = nitgrid * runoff
kill nitgrid all
nitfac = flowaccumulation(sanfdr, nitld)
kill nitld all
niloadkg = nitfac / 100
kill nitfac all
nitload = int(niloadkg)
buildvat nitload
kill niloadkg all
display 9999
mape nitload
gridpaint nitload value linear nowrap gray
linecolor 2
arcs arabasin
arcs misbasin
arcs copbasin
&return
Grid: cellvalue nitload *
Record the average annual nitrogen loadings values at each of the 5
main outlets and
determine the annual loadings from each subwatershed. Type 9 to get back to the Grid prompt.
Grid: kill sanfdr all
phld10k = gridline(con(phosload > 10000,1))
phld5k = gridline(con(phosload > 5000,1))
phld1k = gridline(con(phosload > 1000,1))
&return
and save the file as line.aml in your local directory. Run the aml
using:
Available Coverages
 -------------------
  ARABASIN          COPBASIN          MISBASIN          PHLD10K
  PHLD1K            PHLD50K           PHLD5K            RAINCOV
  RUNOFFCV          SANBAYS           SANBORD           SANLU
  STREAMS
Ok, they are there. If you have a problem with running your aml,
kill off any coverages or grids that it created in executing part way through,
correct the problem, and then rerun the AML. in the Alpha workspace and, in a new View,
add the following themes: phld50k, phld10k, phld5k, phld1k, sanbord (arc),
and sanbays (polygon). In the legend of the new View, drag sanbord and
sanbays to the bottom of the theme list. Then, rearrange the phosphorus
load themes in decreasing order, from phld50k at the top down to phld1k.
Using the Fill Palette, select light colors for the smaller threshold themes
and darker colors for the larger loading themes: all of these themes in the View to get an
overview of average annual phosphorus loadings in the basin.
all of these themes in the View to get an
overview of average annual phosphorus loadings in the basin.
nild300k = gridline(con(nitload > 300000,1))
nild200k = gridline(con(nitload > 200000,1))
nild100k = gridline(con(nitload > 100000,1))
nild50k = gridline(con(nitload > 50000,1))
nild10k = gridline(con(nitload > 10000,1))
nild5k = gridline(con(nitload > 5000,1))
nild1k = gridline(con(nitload > 1000,1))
&return
Execute the aml from the grid prompt in the same way that you did with
the previous AML's that you wrote. Use ArcView to display these newly
created arc coverages to give a spatial representation of average annual
Nitrogen loadings in the basin.6. Predicting Concentrations in Watershed Stream
Networks
Arc: copy /res2/maidment/nonpoint/runoff runoff
Arc: copy /res2/maidment/nonpoint/sanfdr sanfdr
Arc: copy /res2/maidment/nonpoint/phopts phopts (**you'll need this later**)
Arc: copy /res2/maidment/nonpoint/snurbres snurbres (**this is a coverage of urban residential land uses**)
Arc: grid
Grid: kill runoff all
Grid: phosconc = ( phosload / runacc ) * 1000
Grid: phconstr = con(strmgrid,phosconc)
Grid: kill phosconc all
Grid: phcon5 = gridline(con(phconstr > 0.5,1))
Grid: phcon2 = gridline(con(phconstr > 0.2,1))
Grid: phcon = gridline(con(phconstr > 0,1)) in the Alpha workspace and, in a new View,
add the following themes: phcon10, phcon5, phcon2, phcon, streams, sanbord (arc), sanbays (polygon), snurbres (polygon), and phopts (polygon). In the legend of the new View, drag sanbord, sanbays, snurbres, and streams to the bottom of the theme list. Then, rearrange the concentration themes in decreasing order, from phcon10 at the top down to phcon. Place the phopts theme at the very top. button and
with  selected, change the
  from 5 to 6. Then click on . Use the and buttons to specify the 6 ranges shown here:
 and close the Legend Editor.
Select all of the themes in the View to get a
predicted phosphorus concentration profile as compared with the
average measured concentration in the basin.
and close the Legend Editor.
Select all of the themes in the View to get a
predicted phosphorus concentration profile as compared with the
average measured concentration in the basin.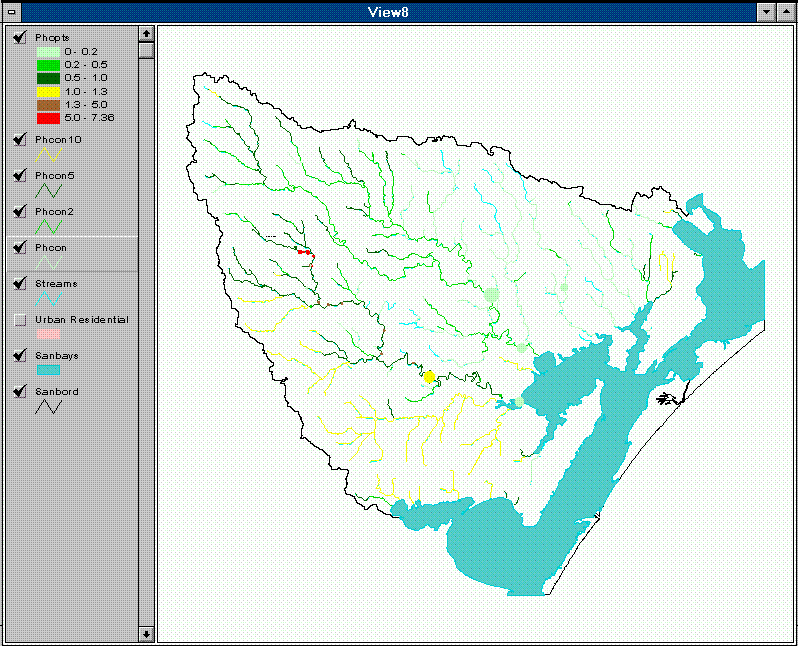
7. Cleaning Up
Grid: kill snurbres all
Grid: kill phosconc all
Grid: kill phconstr all
Grid: kill phcon all
Grid: kill phcon2 all
Grid: kill phcon5 all
Grid: kill phcon10 all
Grid: kill strmgrid all
Grid: kill runacc all
Grid: kill raincov all
Grid: kill sanbord all
Grid: kill streams all
Grid: kill sanbays all
Grid: kill arabasin all
Grid: kill misbasin all
Grid: kill copbasin all
Grid: kill sanlu all
Grid: kill runoffcv all
Grid: kill maxload all
Grid: kill nitload all
Grid: kill phosload all
Grid: kill phld50k all
Grid: kill phld10k all
Grid: kill phld5k all
Grid: kill phld1k all
Grid: kill nild300k all
Grid: kill nild200k all
Grid: kill nild100k all
Grid: kill nild50k all
Grid: kill nild10k all
Grid: kill nild5k all
Grid: kill nild1k all
Grid: quit
Arc: quit
$: cd info
$: rm *
$: cd ..
$: rmdir info
$: rm *
$: cd
$: rmdir ex5